It can be pretty common for your project to have some security and confidentiality problematics?. In some cases, your application may need to access an internal web service:
- It is a private business application accessing confidential internal information.
- It is an application accessing some web services currently under development and those services must remain private until finished.
Accessing those private backends while automating your tests in the cloud can be tricky. You could do it with a VPN, but it can be cumbersome. Adb reverse is another solution, easier to set up. Luckily for you, we managed to make it work with Genymotion Cloud ?. Let’s dig in and see how it works!
In this article, we study the case of an app running automated tests from Genymotion Cloud, but accessing web services running on a private network.
TL;DR
1. On your CI server, run a local proxy (such as Squid, running on port 3128).
2. Start a Genymotion Cloud device using the gmsaas CLI:
uuid=$(gmsaas instances start 143eb44a-1d3a-4f27-bcac-3c40124e2836 pixel3)

gmsaas instances adbconnect $uuid
This gives you access to the device through ADB.
3. Configure the proxy settings in the device using ADB: adb shell settings put global http_proxy localhost:3333
4. Bind your local proxy to the device proxy configuration using command: adb reverse tcp:3333 tcp:3128
5. Make sure your app handles Proxy System Settings.
6. Run your tests as usual.
You can also go further by using different URLs depending on the build type… Everything is explained below ?
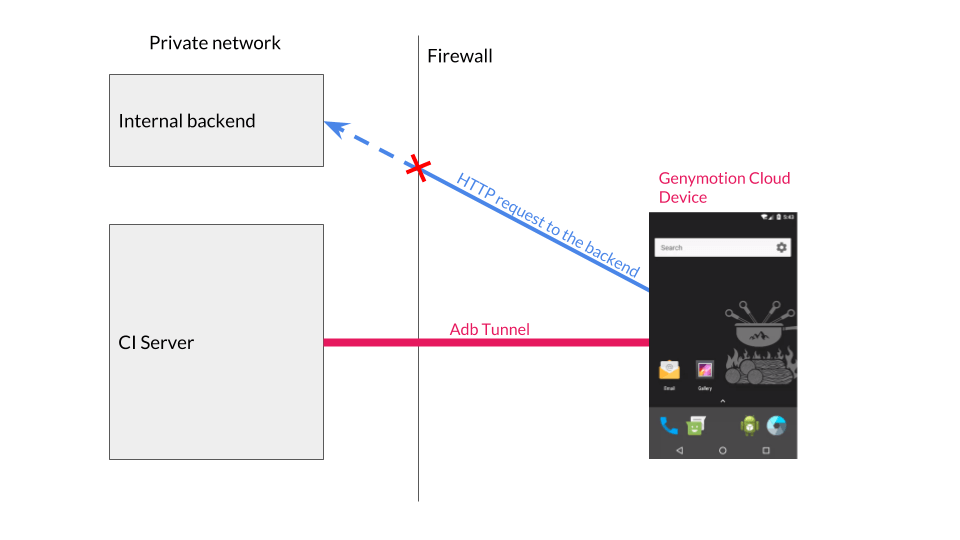
Let’s start with a diagram of the situation:
You can see a Genymotion Cloud device located on our datacenter launched by a continuous integration server running on your internal network. This is done through gmsaas, the Genymotion command line tool. An ADB tunnel is created between the server and the virtual device, allowing to use `adb` on the device, as if it was running locally. On the other hand, your internal web service is not exposed and therefore cannot be accessed from the virtual device.
How to overcome this, without exposing your internal web service to the Internet? ADB reverse to the rescue! ?
Accessing the infrastructure
Run a local proxy on your CI server
This piece of software is aimed to expose your internal web service located in your infrastructure to a local network connection occurring on your CI server. ADB is running on your CI server, and it is the only one that will connect to the proxy. You must run a single proxy server for all the devices needing access to your internal web service.
There are plenty of ways to start a proxy on your server. Here is for example how to launch a Squid proxy using docker :
First, make sure folder /opt/squid/cache is created.
Also, you must set up a configuration file /opt/squid/squid.conf. You can use this simple configuration:
# Squid proxy port declaration
http_port 3128
# Allow local connections, including Docker’s host
acl localnet src 10.0.0.0/8     # RFC1918 possible internal network
acl localnet src 172.16.0.0/12  # RFC1918 possible internal network
acl localnet src 192.168.0.0/16 # RFC1918 possible internal network
acl localnet src fc00::/7       # RFC 4193 local private network range
acl localnet src fe80::/10      # RFC 4291 link-local (directly plugged) machines
http_access allow localnet
http_access allow localhost
http_access deny all
Then run the following docker command:
docker run --name squid \
 --publish 127.0.0.1:3128:3128 \
 --volume /opt/squid/squid.conf:/etc/squid3/squid.conf \
 --volume /opt/squid/cache:/var/spool/squid3 \
 --volume /opt/squid/cache:/var/log/squid3 \
 sameersbn/squid:3.3.8-12
Start the virtual device
Before each test run, the CI server starts one or several cloud devices using gmsaas. Start a device using:
uuid=$(gmsaas instances start 143eb44a-1d3a-4f27-bcac-3c40124e2836 pixel3)
This command starts a new Pie virtual device on Genymotion Cloud. Once this command is finished, connect to the device with adb : gmsaas instances adbconnect $uuid, you can interact with it using `adb` commands, through the ADB tunnel.
Configure the device to use a proxy
Today, Genymotion Cloud virtual devices are disposable. It means they are deleted when you stop them and all their configuration and files are lost. You must configure them each time you start them.
You can set the proxy configuration from the command line :
adb shell settings put global http_proxy localhost:3333
Note: If you need a more precise configuration (configuring the proxy exclusion list for example), we recommend configuring a Genymotion Cloud virtual device through the Wifi Settings application and to share it on Genymotion Cloud with all your team as explained in the documentation.
Bind the device’s configuration to your CI server’s proxy
Now on one side, we have a Squid proxy running on the CI server bound to local port 3128 and on the other side, we have a device looking for a proxy server on its own local port 3333.
ADB allows us to bind those two remote ports thanks to the `adb reverse` command.
Run command: adb reverse tcp:3333 tcp:3128
This command redirects all the network traffic inside the device going to localhost:3333 to your computer localhost:3128.
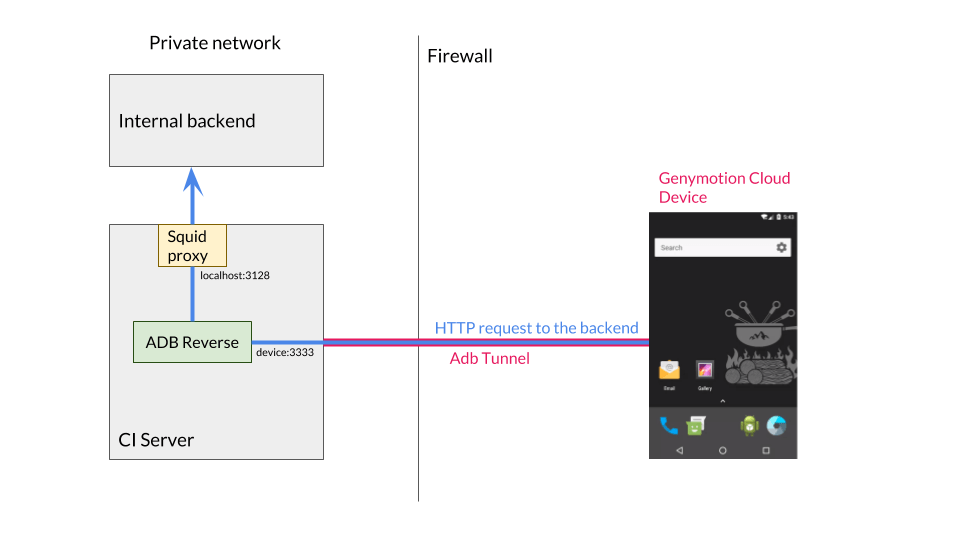
Once everything is set up, here is how your infrastructure behaves:
All the network traffic of the cloud device goes through the ADBtunnel, arrives to the ADB server running on your CI computer and is redirected to the Squid proxy, exposing your internal web service to the remote virtual device. Your internal web service is then accessible from your app, as soon as you make sure it observes the proxy system settings.
Note: The `adb reverse` command is supported on Android since Android 5.0 only, so make sure you select the right version.
Use the proxy system settings in your app
You must be careful that your HTTP client observes the proxy settings that have been set up.
If you are using OKHttp library, this is handled directly by the client, there is nothing to do from your part. If not using OKHttp library, you must set the proxy from your app source code, depending on your HTTP client.
Conclusion
You did it! A simple setup where you decide to allow cloud devices to securely access an internal web service. Now you can launch your tests through Gradle or any other testing framework.?
As you can see, with Genymotion Cloud, you don’t need to set up a VPN, there is no port to open, and you have access to a seamless and very fast ADB experience.?
Eyal Lezmy.


